
Q: I'm drilling and nothing is happening. What am I doing wrong?
A: Make sure your drill is in reverse. All of our products require the use of a reversible drill. Also, when drilling in hardened materials, the slower the drill speed the more effective the tool will drill. Drilling at high speed causes the material being drilled into to become harder, and more difficult to drill into.
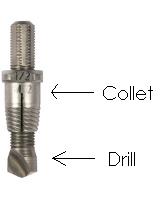
Q: What part of the Drill-Out® is the drill and what part is the collet?
A:
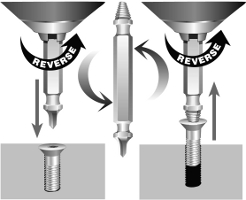
Q: Which end of the Grabit®/Grabit®-Pro/Grabit®-Micro is the burnishing end and what end is the extracting end?
A:
| Grabit® | Grabit®-Pro | Grabit®-Micro |
| 1. Burnish 2. Flip 3. Extract | 1. Burnish/Drill 2. Flip 3. Extract | 1. Drill 2. Flip 3. Extract |
|
|

|
Note: Burnishing is not the same as drilling. Burnishing reshapes the inside of a damaged screw head, whereas drilling creates a new hole in the surface of a broken bolt so the extracting end of the tool can bite into the fastener and remove it.
Q: Can I use your products to remove non-standard left-handed-thread screws?
A: No. Since Alden products work only in reverse, left-handed-thread screws cannot be removed.
Q: What is the difference between Grabit® and Grabit®-Pro?
A: Grabit®-Pro is a new and improved version of the original Grabit® for the professional tradesman. Grabit®-Pro has been engineered to remove both damaged screws and broken bolts. It is made in the USA from M2 high speed tool steel for maximum performance and durability. The original Grabit® was designed to remove damaged screws only. Grabit® is an effective and affordable solution for most home renovation projects. See our Size Chart for a more detailed view of all of our products' capabilities.
Q: I've seen a similar part being sold under a different name/packaging; is it your product?
A: Yes, Alden products are also available as private label branded products sold by major retailers worldwide. It is quite common for manufacturers to sell a product under their own brand as well as other brands. Also, our own branded products have undergone several revisions over the years and we are currently rebranding our line again. For example, the Pro-Grabit® will be marketed as Grabit®-Pro for certain markets. Fear not, the product itself has not changed; only the names and packaging is changing.
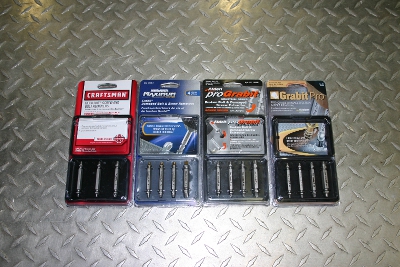
Here you can see our Grabit®-Pro as the Craftsman® Deck-Out™, the Mastercraft® Maximum Grabit®, our current packaging, and a prototype of our newly rebranded packaging.
Q: My part broke, will you replace it?
A: Yes, send us the broken part so our engineers can observe why the part failed, and we'll send you a new piece fresh off the line (the same model you sent us). See our broken parts page.
Q: I have a set but only one piece broke, do I have to send back the whole set?
A: No, just send us the single broken piece so we can replace it for you. See our broken parts page.
Q: Will Alden pay for shipping?
A: You must pay postage to send us the broken tool. Alden will pay for postage for the returned new piece. Broken bits can be sent one tool per envelope at standard postage rates (currently 44¢). This is non-negotiable. See our broken parts page.
Q: If the broken bolt sticks out from the casting, can the broken bolt be removed without cutting the bolt so it is flush with the casting?
A: If the broken bolt sticks out from the casting, it can still be removed without cutting the bolt so it is flush with the casting. The proceedure is to follow the Drill-Out® operating instructions supplied with each tool. To facilitate the drilling of the hole on center, it is recommended that the top of the bolt be filed flat.
Q: Is it possible to remove a broken bolt if the drill depth is not in accordance with the recommended depth? What are the consequences?
A: If the drill depth is LESS than the recommended depth, you cannot remove the broken bolt because the collet/extractor will not engage the broken bolt. The consequence will be that the tool will just spin without grabbing the broken bolt. To remedy this situation, simply thread the collet back against the drill chuck and drill to the recommended depth.
If the drill depth is greater than the recommended depth, the broken bolt can be removed with no consequences. The deeper the hole, the better. However, the drilling operation takes the longest time; drilling only to the recommended depth will result in the fastest time to extraction.
Q: In a flammable area, when a burning torch cannot be used to assist in removal, how can a rusty bolt be extracted?
A: Apply Penetrating oil to the broken bolt. Penetrating oil is slightly acidic and eats away at the corroded material inbetween the the threads. Using a centerpunch and hammer, strike the center of the broken bolt several times to help the penetrating oil work itself into the threads. Remove the collet from the drill body and drill through the broken bolt. For a blind hole, care must be taken not to drill past the end of the bolt and into the casting. Apply penetrating oil to the inside of the broken bolt and allow time for the oil to work into the threads. Assemble the collet back onto the drill body. Proceed with the Drill-Out® drilling in reverse to extract the broken bolt.
Q: How do you remove a steel bolt from an Aluminum engine head?
A: During operation of the engine, it is subjected to high temperatures. When the engine is then shut off, the temperatures return to normal. This occurs very often during the life of the engine. Since the coefficient of thermal expansion of Aluminum is approximately double that of the steel bolts the mating threads of the bolt and engine head are subjected to much pressure. When the mating surfaces of the threads come in close contact with each other, an atomic bond can form between them. They actually weld together. This condition is called "galling." Galling is caused by various conditions including high contact pressure and heat. If galling is not excessive, try the proceedure from the previous example. If extraction is not sucessful with this method, remove the Drill-Out® from the broken bolt and proceed as follows:
Apply heat with a torch to the inside of the hole that you drilled into the broken bolt from the previous procedure. Do not apply heat to the Aluminum head. The purpose is to rapidly heat only the broken bolt. Next, rapidly cool the broken bolt by applying water or some other non-flammable coolant inside the hole. Because of the difference in thermal expansion, the rapid heating and cooling will cause movement between the mating thread surfaces. This movement should break the bond established by the galling.
If this proceedure is not sucessful, then the galling is too excessive and the broken bolt cannot be removed by extraction. After following the above proceedures, you should have a broken bolt with a centered hole drilled through it. Use a tap drill for the size of the broken bolt. Drill and retap the hole.
Q: Must the speed of the drill remain constant throughout the drilling and extraction processes?
A: The recommended speed in our brochures and operating instructions is only for extracting the broken bolt. When drilling into the broken bolt, the speed is dependent on the material and hardness of the broken bolt. For softer, low alloy bolts, you should use a high RPM with less axial pressure. For harder, high alloy bolts, you should use a lower RPM with more axial pressure.
Q: The Drill-out® appears to overheat or "worm out" during the extraction process. What am I doing wrong?
A: This will occur if you do not drill into the broken bolt to the minimum recommended depth. Also, if downward pressure is not exerted on the Drill-Out® during the extraction process, the collet will not engage the broken bolt. If adequate pressure is used, the collet will only turn a maximum of one revolution during engagement with the broken bolt. If the collet is not engaged and is allowed to spin on the top of the broken bolt, it can overheat with time.
Q: I'm having trouble drilling the center of the bolt. Do you have any tips?
A: The most frequent problem with dilling through the center of a bolt is finding the center. The threads of the bolt make the center of the bolt appear to be in a spot that actually is not the center of the bolt. It is important that you take this into consideration and do your best to find the root center of the broken bolt. Because of the Drill-Out®'s special designed tip, the drill will not wander. It will drill only in the direction that it is pointed. To extract:
Drill a spot as close to the actual bolt center as possible. Stop to look if the spot is off center. If you are off center, angle the drill toward the center of the broken bolt and drill until the point is on center. Once the hole is started on center, hold the drill parallel to the axis of the bolt and continue drilling. Stop every 1/16" or 2mm in depth to clean out chips and add cutting oil. Verify each time that you are drilling on center and straight.

